Thursday 31 January 2013

Beach Camping


On Tuesday morning we drove west towards the Otways, a place my family went camping when my brother and I were kids. We took the Great Ocean Road, where the car winds around dangerous corners and tourists stop in the middle of the road to take photos of stoned koalas in gumtrees.

We went past Apollo Bay to a secret beach where we camped right next to the ocean, drank beer, made vegetable kebabs, toasted marshmallows, swam in the clear sea and walked over rock pools. We only camped for one night but could have stayed forever. Last night was spent eating dinner with friends we had made at the campground and Casper played with a brother and sister who gave him stickers and played Klop! until it was time to drive back to Melbourne.

 I have redesigned my blog yet again, but this time I will leave it for a while. I was having issues with the picture size and quality, but I have figured that out too. What do you think of it?

I am posting my giveaway tomorrow, so keep your eyes peeled!


Monday 28 January 2013

Healesville Sanctuary


On Saturday we went to Healesville Sanctuary. We had a wonderful day- Casper got to skip his nap, eat "chocoot" biscuits and see lots of animals. Jess got to feed and pat a kangaroo and she was amazed by the koalas. My favourite animal was the Lyrebird and I am considering making an embroidery of one! 

Mel took us for a little drive into the Yarra Ranges on the way home which was so beautiful. I love those mountains.

We are going on to the Otways for the next couple of days, so it will be a bit quiet around these parts until Thursday, but I will be coming back with a special handmade giveaway! 

Sunday 27 January 2013

Bonnie and Clyde


This picture encapsulates everything about their friendship perfectly. 


4/52


"A portrait of my child once a week, every week in 2013"

Casper: Those eyelashes.

and

At Healesville Sanctuary.

Joining in with Jodi. Also on my Tumblr.


This week I did two paintings. I'm not really sure which direction I am going with this project. I feel like I should be making portraits that look like rather than represent my subject (Casper) but only because I don't know how far I will go if I start abstracting this whole portrait idea.
 I would appreciate feedback, but I don't think it will change what I do in the future. So which portrait do you prefer? I'm still not sure.


xxx Ruby


Friday 25 January 2013

Book Binding Tutorial


I am the kind of person who has always kept a diary of some sort. I mainly keep drawing and watercolour books now, as I haven't felt the itch to write down very much in the last few years which is a bit sad. Although when I look at a painting I am brought back to the time and place it was created in and that is just as magical as reading words that do the same thing.

Because I go through them so fast, I make all of my own sketchbooks. I can now knock one out in about 45 minutes to an hour and I get to use really good quality watercolour paper as there's no real cost in making them. I'm going to attempt to explain my process to you Dear Reader, however you should first know that I have never undergone any book-binding training, nor do I know whether what I do is the best way of doing it. I just know that in my 5+ years of making these notebooks, they have stayed intact and kept beautifully.


Ingredients: 
One old hardcover book (that has an interesting enough cover but is not too precious)
A bunch of paper - I use Arches 300 gm watercolour paper (cold pressed)
A joining needle (for doll-making)
A ball of crochet cotton
A Stanley knife
A good quality glue stick
Some scrap fabric
Decorative paper for the inside cover
A pencil


The first step is to measure, fold and rip your paper into the size you want your pages. I usually make my pages 2cm smaller in width and length than my book cover. Obviously this measurement is the page size doubled and folded. I say 'rip' rather than 'cut' because I feel it maintains the integrity of the paper, and also looks so cool at the end, like a weird handmade bible. 


After you have finished, you should have a lovely little pile that looks like this: I have made 10 pieces of paper which then becomes 20 individual pages.


Take your stanley knife and carefully cut the paper in the book away from the original cover. Make sure not to cut the spine out at the same time!


Measure and cut up your scrap fabric to be roughly 6cm more the width of the spine and 1cm less than the length of the book.


Trace around the edge of the book cover and cut out your decorative paper to create an inside cover. Make sure to cut it slightly smaller than the actual cover, as it need to sit inside.


Glue the fabric to the inside lining- this will help strengthen the structure of the sketchbook.


Fold in half...


And draw one line along the crease, with two parellel lines running 1cm out along either side of the central line. These will be your guide for setting the pages in your book.


Squeeze your pages tightly and mark with a pencil where you want to stitch them together.


Thread your needle, about the length of your forearm, doubled over and knot it at the end.


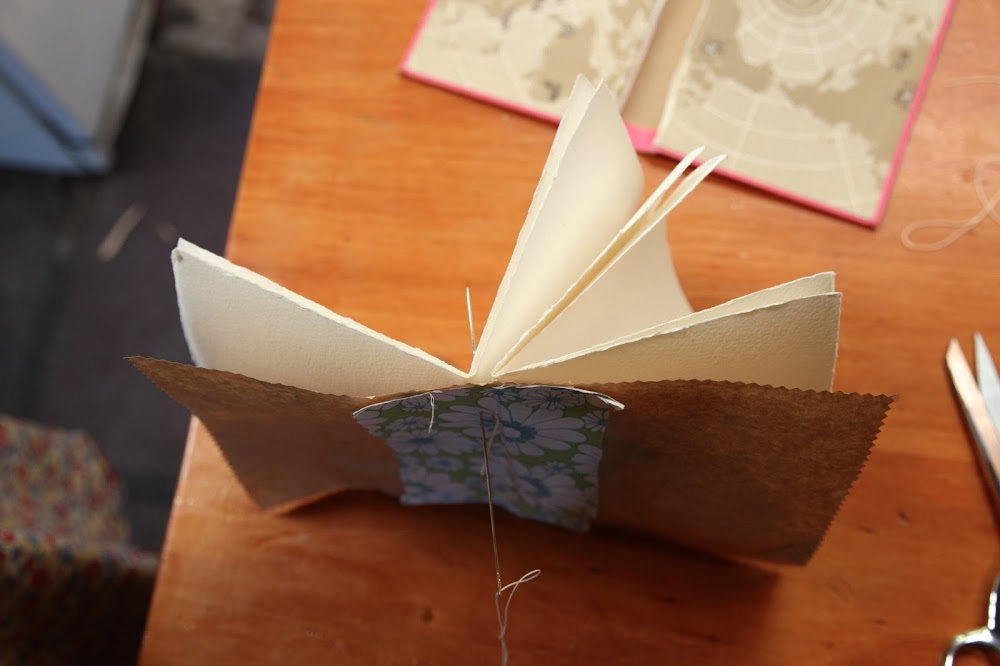
Line the pages up straight and use your pencil markings as a rough guide for sewing the pages on to your paper and fabric inner-cover. I usually sew twice through each page, but whatever feels/looks right to you, should work well as long as your knot is secure on the back side.


When your thread is getting low, knot it off neatly as demonstrated in this .gif I made just for you


When you have finished sewing along the three lines you marked out on the inside cover, the back should look like this:


There should be gaps left in between the pages like this:


Don't worry, they will serve as a guide for the next pages to be sewn in!


When you have finished sewing all of the pages in and they are snugly nestled together resembling something like a book you can rest assured, you are very close to the end.


Now get your glue stick ready...


And start applying glue liberally to ONE side of the hard cover.


Working quickly, set the pages down on the glue, making sure the spine matches up with the stitched paper. Smooth the decorative cover down, making sure that it matches up neatly with the edges.


Repeat on the other side and you're done!


Disclaimer- wrinkles, uneven pages and scuffed covers are a part of the deal and I think they make your book even more interesting.


Monday 21 January 2013

A Beach Holiday


We went holidaying in Gippsland last week, which is why I have been so silent in this space. It was a whirlwind tour in which we traveled to Walkerville, Sale, Kilcunda and Venus Bay in four days.
Here's my summation in dot-point form, as I am trying to relax on my first toddler-free day of the year (yay for childcare)!

1&2: "At our beach, at our magic beach, we swim in the sparkling sea, surfing and splashing and jumping the waves, shrieking and laughing with glee."  -Walkerville, the setting for Alison Lester's children's book Magic Beach.

3,4&5: Nappy time, baked beans, champagne on the dry lawn and chilli fetta pasta at Rhiana's place in Sale.

6,7,8&9: Wild and wooly in the tea-tree forest at Dave and Barb's in Kilcunda.

10&11: Still in Killy, taking in the architecture- a rooftop garden in the making and generous window seats.

12,13,14&15: Heather and Ian's home in Venus Bay, with views of Anderson's Inlet. The bush block where I spent many holidays as a child. The house has a fish pond wrapped around one side and you can feed the fish through the windows.

16&17: Some pillows I made for Heather when I was about 17, I can't believe they are still intact!

18: Peachy sunset.

19: Growing collection for the cabinet of curiosities.

20:  Casper playing with old Yowie toys, next to a rug designed by Ian.

21,22,23&24: Back to Magic Beach because we can't stay away: seaweed, rock pools, blue water, velvet bathers, cave exploring and views of the Prom.